Integrations
Your tags with the GTM template
With the GTM template, your Google Analytics, Meta and other tags must wait for consent: the csm_consent_update trigger to create, the consent to require by tool type, and how to verify with Preview.
With the GTM template installation, Consorm loads the banner and declares Consent Mode, but your tags stay in your container. So that none of them fires before the visitor's choice, every tag must meet two conditions: fire on Consorm's consent signal rather than on a page load, and require the consent of its category. This page describes the exact configuration, tag by tag.
Why a dedicated trigger
The template loads Consorm's script from our CDN, asynchronously. A tag placed on a page trigger ("Consent Initialization", "Initialization" or "All Pages") fires in the same split second, before that script could hold it back. And GTM only evaluates a tag when its trigger occurs: a tag blocked at load time by a consent check does not fire again by itself when the visitor accepts.
The banner therefore pushes the csm_consent_update event into the dataLayer in two situations: when the visitor has just accepted at least one category, and on each page load for a visitor whose choice is already recorded. A tag fired on that event is evaluated at the right moment, with the visitor's real consent.
Step 1: Create the trigger
- 1In Google Tag Manager, open Triggers → New and name it
Consorm - Consent Updated. - 2As the type, choose Custom Event.
- 3In Event name, enter exactly
csm_consent_update, without ticking the regex option. - 4Leave All Custom Events selected, then save.
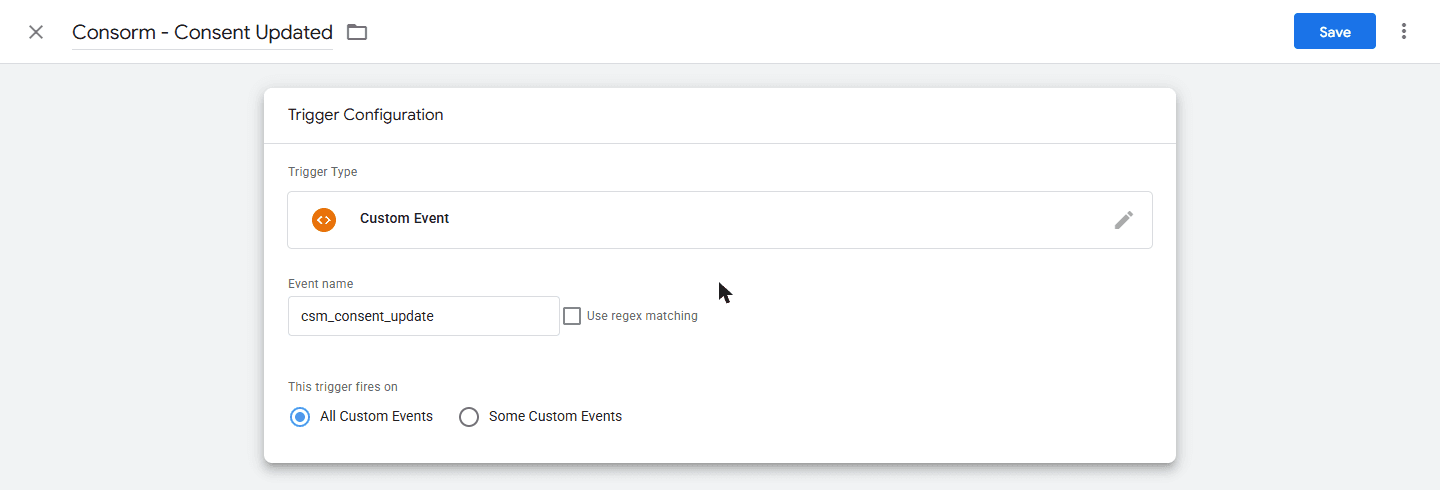
csm_consent_update, "All Custom Events".Step 2: Apply the trigger to every tag
This applies to every tag that sets cookies or sends data to a third party: Google Analytics, Meta Pixel, Google Ads, TikTok, LinkedIn, Hotjar, Clarity and the others. Two cases, depending on whether you create the tag after Consorm or it already existed.
You are creating a new tag
- 1Open Tags → New, choose the type (for example Google Tag for Google Analytics) and enter the tool's identifier.
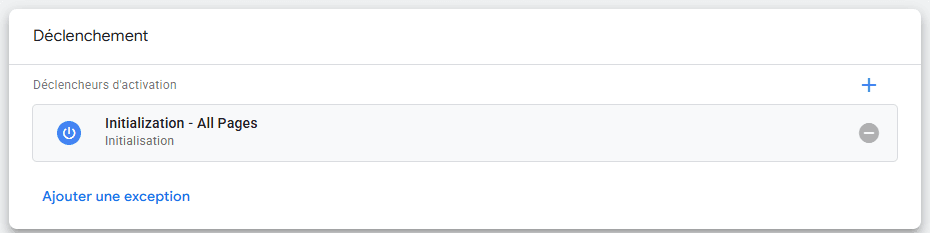
- 2GTM often adds a page trigger on its own, for example "Initialization - All Pages" for a Google Tag. Under Triggering, remove it with the "minus" icon: the tag must have no page trigger.
- 3Click the "plus" icon and choose the
Consorm - Consent Updatedtrigger. - 4In Tag Configuration, open Advanced Settings and, under Tag firing options, choose Once per page. The signal can fire more than once on the same page, for instance when the visitor accepts analytics then adds advertising in their preferences; without this option, a page view would be counted twice.
- 5Go to step 3 before saving.
The tag already existed
- 1Open the tag and, under Triggering, remove all its page triggers with the "minus" icon: "All Pages", "Initialization - All Pages", "Consent Initialization - All Pages" or any other Page View trigger.
- 2Click the "plus" icon and choose the
Consorm - Consent Updatedtrigger. - 3Under Advanced Settings → Tag firing options, choose Once per page.
- 4Go to step 3 before saving.

Consorm - Consent Updated.Tags tied to a specific page
For a tag that must only fire on certain pages, such as a conversion on a thank-you page, create a second csm_consent_update trigger in Some Custom Events mode, with the condition "Page URL contains thank-you" (adapt to your address). For a visitor who has already made their choice, the signal fires on page load, so the conversion is recorded normally.
Step 3: Require the right consent
The trigger says when to evaluate the tag; the consent check says whether it is allowed to fire. The signal also fires for a visitor who refused one category and accepted another: without this check, an analytics tag would fire for a visitor who accepted advertising only. In each tag, open Advanced Settings → Consent Settings, choose Require additional consent for tag to fire and add the types matching the tool:
| Tool type | Examples | Consent to require |
|---|---|---|
| Analytics | Google Analytics 4, Microsoft Clarity, Hotjar, PostHog | analytics_storage |
| Advertising | Meta Pixel, Google Ads, TikTok, LinkedIn Insight | ad_storage, ad_user_data, ad_personalization |
| Functional | Live chat, embedded videos, preferences | functionality_storage, personalization_storage |
A tag used for both analytics and advertising gets the types of both rows. These are exactly the settings the automatic installation applies to each provider.
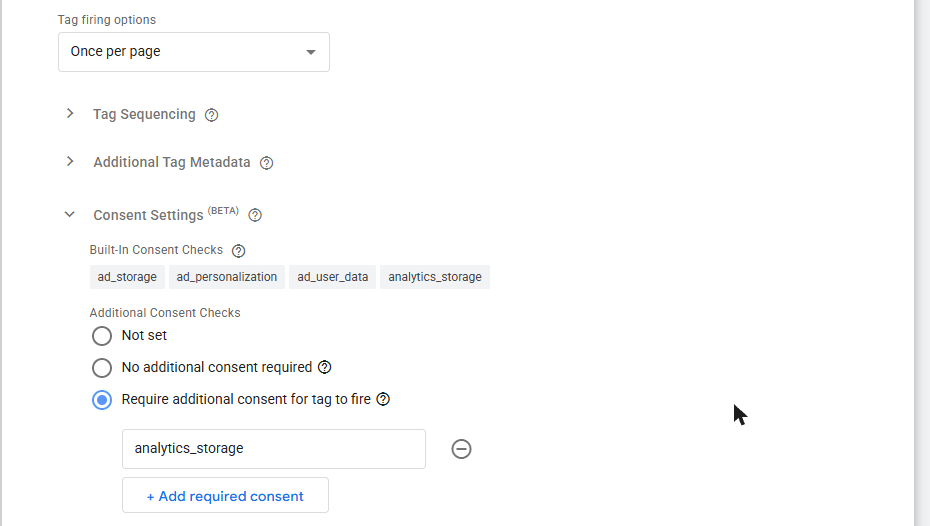
analytics_storage as the only additional consent.Do not require everything on every tag
A tag only fires when all the required consent is granted. If you add ad_storage to Google Analytics, a visitor who accepts analytics but refuses advertising will never be counted. The right setting is the one matching the tool's category, not the longest one.
Built-in checks are not enough
Google tags show a Built-in consent checks list. It only means the tag can read those signals and adapts its behavior: it still fires and sends anonymous data to Google. Only the additional consent actually prevents the tag from firing.
Example: Google Analytics 4
- Trigger:
Consorm - Consent Updatedonly. - Tag firing options: Once per page.
- Additional consent:
analytics_storage, and nothing else.
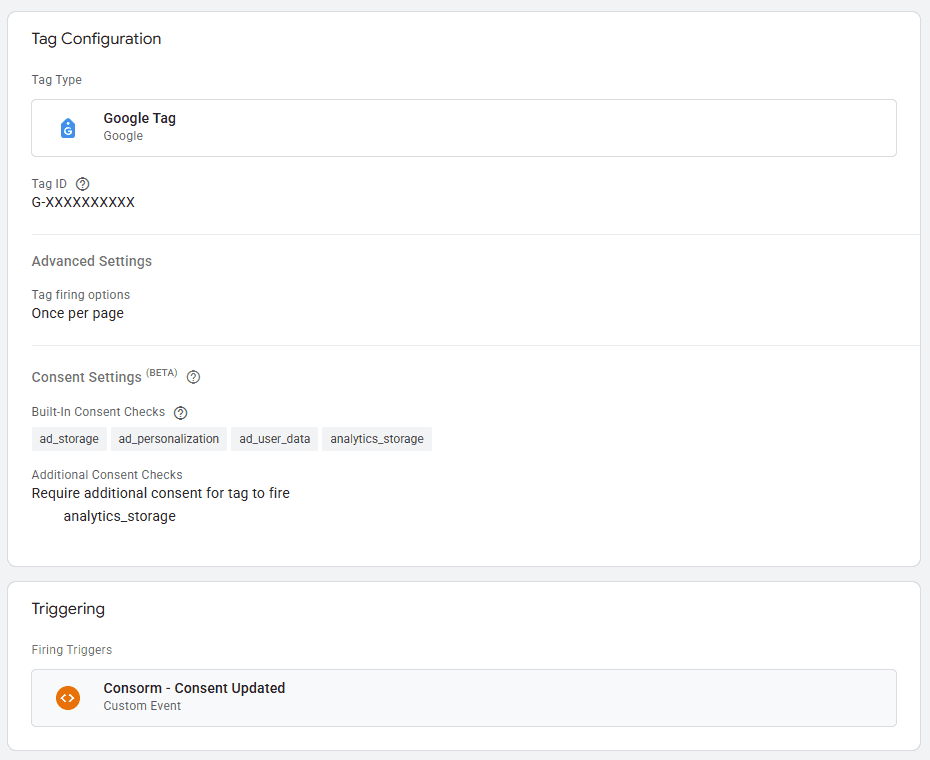
analytics_storage as additional consent, and Consorm - Consent Updated as the only trigger.For Meta Pixel, same trigger and same options, with ad_storage, ad_user_data and ad_personalization as the required consent.
What happens for the visitor
| Situation | Result |
|---|---|
| New visitor, before any click | No signal: the tag is not evaluated, nothing fires. |
| Click on "Accept all" | Consent Mode switches to granted, the signal fires, the tag fires on the current page. |
| Returning visitor with a recorded choice | The signal fires on load, the tag fires if its category was accepted. |
| Consent refused or withdrawn, following pages | The signal fires, but GTM lists the tag under "Blocked by Consent Settings". |
Verify with GTM Preview
Start GTM's Preview on your site, in a private window so you start without a recorded choice, then check these three moments in Tag Assistant:
- 1On load, before any click: the Consorm tag is under "Tags Fired" on the Consent Initialization event; your other tags are under "Tags Not Fired" and no
csm_consent_updateevent appears. - 2After "Accept all": a
csm_consent_updateevent appears in the left-hand list; opening it, your tags are under "Tags Fired" with the "Succeeded" status, and the Consent tab shows the granted signals. - 3After "Reject all" (new private window): your tags fire on no event. If you change page, they appear under "Tags Blocked by Consent Settings".
Google tags and advanced mode
Google's standard setup places the Google tag on "Initialization - All Pages" with no additional consent: the tag then fires before the visitor's choice and sends cookieless signals (Consent Mode's advanced mode). Consorm recommends the configuration on this page, where nothing is sent before acceptance.